
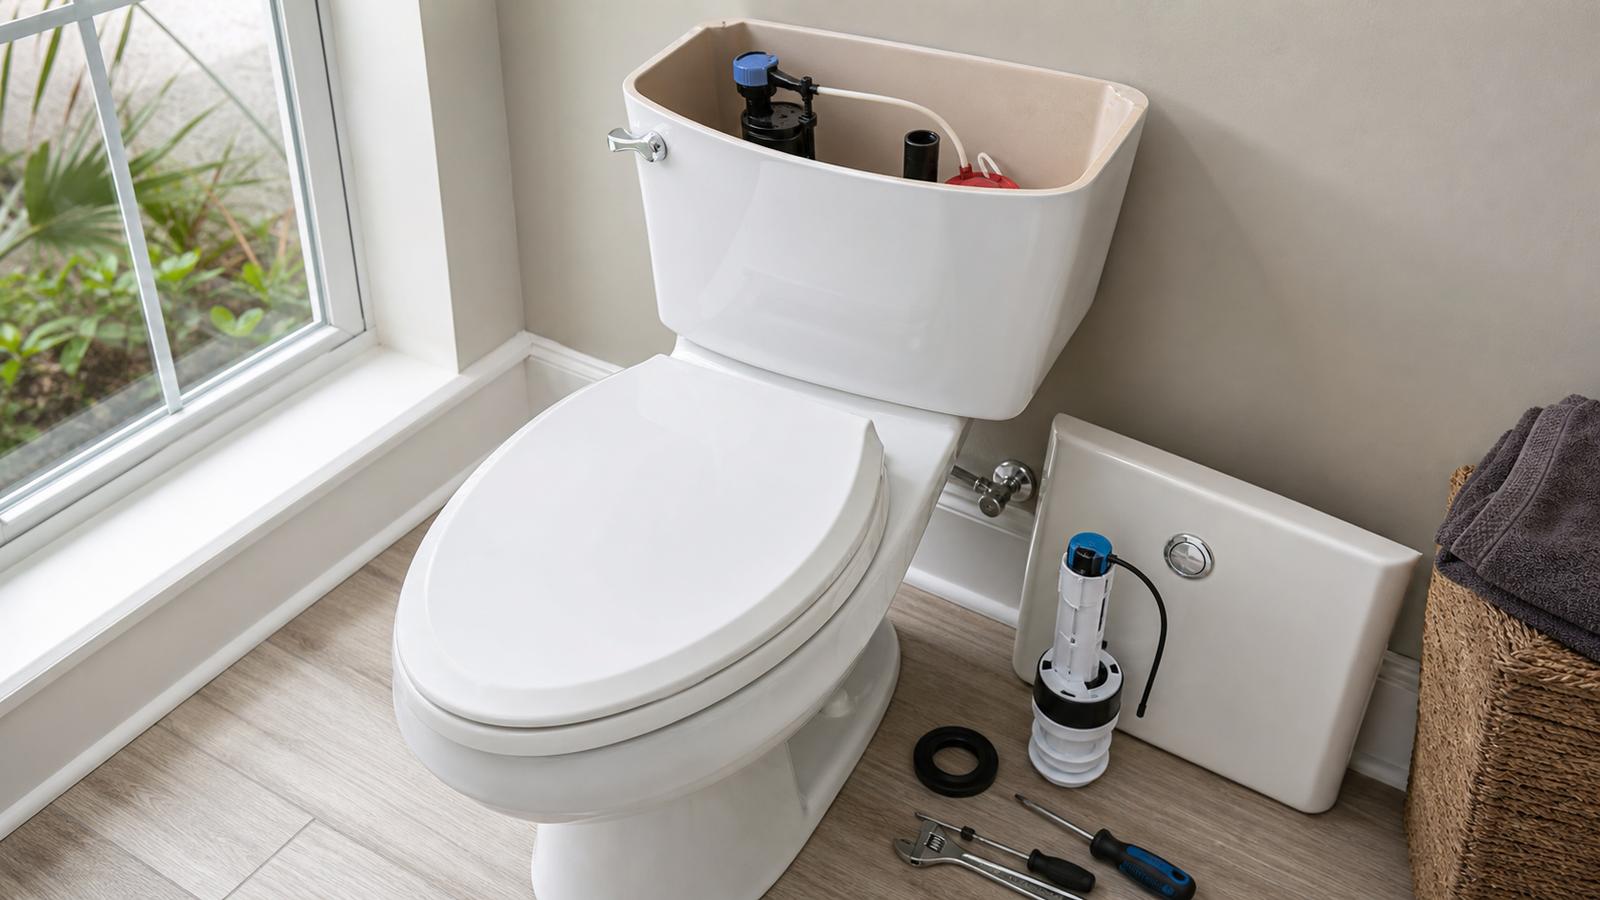
Safety boundary
Stop and reassess if
- Shut off the water supply at the valve behind the toilet before beginning any work inside the tank
- Place towels around the work area to catch water that drips from components during removal
- Avoid overtightening nuts and connections, which can crack porcelain tanks
- Do not use bricks or materials that deteriorate as displacement devices inside the tank
- Wear gloves when handling old flappers and tank components that may have mineral buildup or bacteria
- Ensure the toilet is stable and does not rock before performing upgrades; a loose toilet indicates floor or flange problems that require professional repair
- If you encounter cracked porcelain, stop work immediately and consult a plumber, as cracks can worsen and cause sudden failure
Older toilets consume between three and seven gallons per flush, making them one of the largest sources of indoor water waste in American homes. Modern efficiency standards mandate 1.6 gallons per flush or less, but replacing an entire toilet involves significant expense, disposal logistics, and pot
The right upgrade depends on your toilet's age, condition, and internal configuration. A toilet manufactured before 1994 offers the greatest savings potential because it likely uses 3.5 gallons or more per flush. Models from 1994 to 2006 typically consume 1.6 gallons, leaving less room for improveme
Assessing Your Current Toilet
Before purchasing any components, identify your toilet's flush volume and internal mechanism type. The manufacture date often appears stamped inside the tank lid or on the bowl behind the seat. If no date is visible, the flush volume provides a clue: fill a bucket from another source, flush the toil
Open the tank and observe the fill valve, flapper, and flush valve assembly. Older toilets use ball-cock fill valves with a float arm and ball, while newer models employ compact float-cup designs. The flapper is the rubber seal at the tank bottom that lifts during a flush. Note whether your toilet h
Check for active leaks by adding several drops of food coloring to the tank water, then waiting thirty minutes without flushing. If color appears in the bowl, the flapper is leaking and wasting water continuously. A slow leak can waste hundreds of gallons monthly, making flapper replacement the most
Flapper Replacement for Leak Prevention
A worn flapper is the most common cause of toilet water waste. The rubber deteriorates over time, preventing a complete seal and allowing water to seep from the tank into the bowl. This silent leak often goes unnoticed until a water bill arrives with unexpectedly high consumption. Replacing a flappe
Universal flappers fit most toilets, but checking the flush valve diameter ensures proper fit. Standard valves measure two inches, while some high-efficiency models use three-inch openings. Adjustable flappers accommodate both sizes and include a dial or slider that controls how long the flapper sta
Installation involves shutting off the water supply at the valve behind the toilet, flushing to empty the tank, and unhooking the old flapper from the flush valve ears and chain. The new flapper snaps or hooks into place, and the chain connects to the flush lever with enough slack to let the flapper
The primary drawback of flapper-only upgrades is limited savings potential. If your toilet already uses 1.6 gallons per flush and the flapper was sealing properly, a new flapper simply maintains existing efficiency rather than improving it. Adjustable flappers that close early can reduce flush volum
Fill Valve Upgrades for Faster, Quieter Refills
Modern fill valves refill the tank more quickly and quietly than older ball-cock mechanisms while offering precise water-level adjustment. Replacing a fill valve does not directly reduce flush volume, but it eliminates overfilling that wastes water and prevents the hissing sound of a valve that runs
Fill valves are sold as universal-fit components with adjustable height to accommodate different tank depths. Look for models with a float-cup design rather than a float ball, as the cup mechanism is more reliable and takes up less space in the tank. Some fill valves include a refill tube that direc
To replace a fill valve, shut off the water supply and flush the tank empty. Use an adjustable wrench or slip-joint pliers to disconnect the supply line from the threaded shank beneath the tank, then unscrew the lock nut holding the old valve in place. Lift out the old valve, insert the new one, and
Fill valve replacement pairs well with flapper upgrades because you already have the water off and the tank empty. The combined project takes thirty to forty-five minutes and addresses the two most common sources of toilet water waste. The main limitation is that these components do not change the f
Dual-Flush Conversion Kits
Dual-flush systems offer two flush options: a reduced-volume flush for liquid waste and a full flush for solids. This approach can cut water consumption by twenty to thirty percent in typical household use, delivering savings that approach a new high-efficiency toilet without the replacement cost. C
These kits work best on toilets with a two-inch flush valve and a standard tank configuration. Toilets with unusual shapes, integrated tanks, or proprietary flush mechanisms may not accommodate aftermarket conversion hardware. Measure the flush valve opening and compare it to the kit specifications
Installation is more involved than a simple flapper swap. After shutting off water and emptying the tank, you remove the old flush valve by unscrewing the large lock nut underneath the tank—this often requires a spud wrench or large adjustable pliers because the nut is several inches in diameter and
Adjustment is critical for dual-flush performance. The kit includes settings for both flush volumes, typically controlled by rotating a dial or moving a slider on the valve body. Start with the manufacturer's recommended settings, then test both flush options with toilet paper to ensure the reduced
The primary tradeoff with dual-flush conversions is user behavior. Household members must remember to select the appropriate flush, and guests may default to the full flush if the controls are not intuitive. Some kits use a push-button design on the tank lid that is less familiar to American users a
Tank Bank and Displacement Devices
Displacement devices reduce the volume of water available in the tank, forcing the toilet to flush with less. These range from purpose-built tank banks—weighted plastic bags filled with water—to DIY solutions like plastic bottles filled with pebbles. The concept is simple: the displaced volume means
This approach works only on toilets that overfill or use significantly more water than necessary for effective waste removal. Toilets designed to operate at 1.6 gallons per flush already use the minimum volume for reliable performance under most drain conditions, and further reduction risks clogs an
Place the displacement device away from the flush valve, flapper, and fill valve to avoid interfering with operation. Avoid using bricks, which deteriorate and shed particles that damage valve components. Monitor flush performance closely after installing any displacement device, and remove it immed
The advantage of displacement devices is negligible cost and instant reversibility. The disadvantage is unpredictability—what works in one toilet may cause problems in another due to differences in bowl design, drain configuration, and water pressure. This method also does nothing to address leaks o
High-Efficiency Flush Valve Retrofits
Some manufacturers offer retrofit flush valves designed to improve the flush power of existing toilets while using less water. These valves use larger openings, optimized flapper designs, or accelerator cones that increase water velocity as it enters the bowl. The goal is to achieve better waste rem
Compatibility is the major constraint. These valves require specific bowl designs and trap configurations to function as intended, and most manufacturers provide limited compatibility information for toilets they did not produce. Installing a high-efficiency valve in an incompatible toilet can resul
Installation follows the same process as dual-flush conversion: shut off water, empty the tank, remove the old flush valve, install the new assembly with proper gaskets and sealing, and adjust settings according to instructions. These valves often include adjustable flush volume controls that let yo
The benefit of a high-efficiency flush valve is potential water savings without changing user behavior—there is still a single flush option, so no one needs to choose between settings. The drawback is higher cost than a simple flapper replacement and the risk that the valve will not perform as expec
Maintenance Implications and Long-Term Performance
All toilet upgrades require periodic maintenance to sustain water savings. Flappers degrade over time due to chlorine, minerals, and mechanical wear, typically lasting three to five years before replacement is necessary. Fill valves can accumulate mineral deposits that affect shutoff precision, espe
Establish a simple inspection routine: check for leaks every few months using the food-coloring test, listen for running water that indicates a fill valve issue, and observe whether flush performance has changed. Catching problems early prevents water waste and avoids the frustration of a toilet tha
Water quality affects component longevity. Hard water accelerates mineral buildup on valve seats and flapper surfaces, reducing seal effectiveness and shortening service life. If your area has hard water, consider installing a whole-house water softener or at minimum clean toilet components annually
When to Call a Plumbing Professional
Homeowners can safely perform the upgrades described here because they involve only components inside the toilet tank and do not require modifying supply lines, drain connections, or structural elements. However, certain conditions indicate the need for professional assessment. If your toilet rocks
Persistent flushing problems that do not resolve with new components suggest issues in the drain line, vent stack, or bowl passages that require diagnostic tools and expertise. A plumber can camera-inspect the drain, clear obstructions, or determine whether the toilet itself has internal defects tha
If you are uncomfortable working with water supply connections, lack the physical ability to reach behind the toilet or lift tank components, or encounter corroded nuts that will not budge, hiring a professional is the sensible choice. Forcing a stuck nut can crack the tank, and cross-threading a su
Some jurisdictions regulate toilet modifications or require permits for plumbing work, even component replacement. Check with your local building department or authority having jurisdiction to understand what rules apply in your area. Manufacturer instructions may also specify installation requireme
Measuring and Verifying Savings
After completing upgrades, verify that water consumption has actually decreased. The simplest method is comparing water bills before and after the modification, accounting for seasonal variations and changes in household occupancy. A more immediate check involves measuring flush volume directly: mar
Monitor for unintended consequences such as incomplete waste removal, multiple flushes, or slow bowl drainage. If you find yourself flushing twice routinely, the upgrade has failed regardless of the per-flush volume reduction. True water savings come only from single-flush effectiveness, so adjust s
Track maintenance needs over the first year after upgrading. If you are replacing flappers every few months or constantly adjusting fill valves, the components may be poor quality or incompatible with your water conditions. Investing in higher-quality parts or addressing underlying water-quality iss
Planning Your Upgrade Path
Start with the simplest, lowest-cost interventions and progress to more complex upgrades only if initial efforts do not deliver adequate savings. For most toilets, replacing a worn flapper and upgrading the fill valve addresses the majority of water waste at minimal cost and effort. Test flush perfo
If you have a pre-1994 toilet using 3.5 gallons or more per flush, a dual-flush conversion or high-efficiency flush valve offers the next level of savings. These modifications require more time and investment but can reduce consumption by a gallon or more per flush, adding up to significant savings
Consider the age and overall condition of your toilet when planning upgrades. If the fixture is decades old, has persistent problems, or shows signs of wear such as staining that will not clean or a wobbly connection to the floor, replacement may be the better long-term choice despite higher upfront
Coordinate toilet upgrades with other water-saving efforts such as low-flow showerheads, faucet aerators, and leak detection throughout the home. Comprehensive water conservation delivers greater savings than isolated improvements and helps you understand total household consumption patterns. Many w
Sources
Original information
- Residential Toilets — U.S. Environmental Protection Agency
- WaterSense Home Maintenance — U.S. Environmental Protection Agency